Quick start
Sign up, then the five setup steps from a new account to your first campaign.
TextScaleHQ sends texts through your own Twilio or Vonage account. You keep the account, your carrier bills you for each text at its own rates, and you pay us a flat monthly fee for the software. There is no markup on messages.
This guide takes you from a new account to your first campaign. The setup checklist on your dashboard has five steps, and this guide walks them in the same order. Most of it takes a few minutes. The one wait is step 3: carriers approve every toll-free number before it can text, which usually takes a few business days. You can do steps 4 and 5 while you wait.
Create your account#
Sign up with your email and a password. The trial is 30 days and needs no credit card; you add a card only when you choose a plan. We email you a 6-digit code to confirm the address is yours. It works for 10 minutes, so check your spam folder if it doesn’t arrive, or ask for a new one after a minute.
Your setup checklist#
Once the code is in, you land on your dashboard. Until your first campaign goes out, the dashboard is a checklist: Get set up, five steps, with a progress bar that fills as you go.
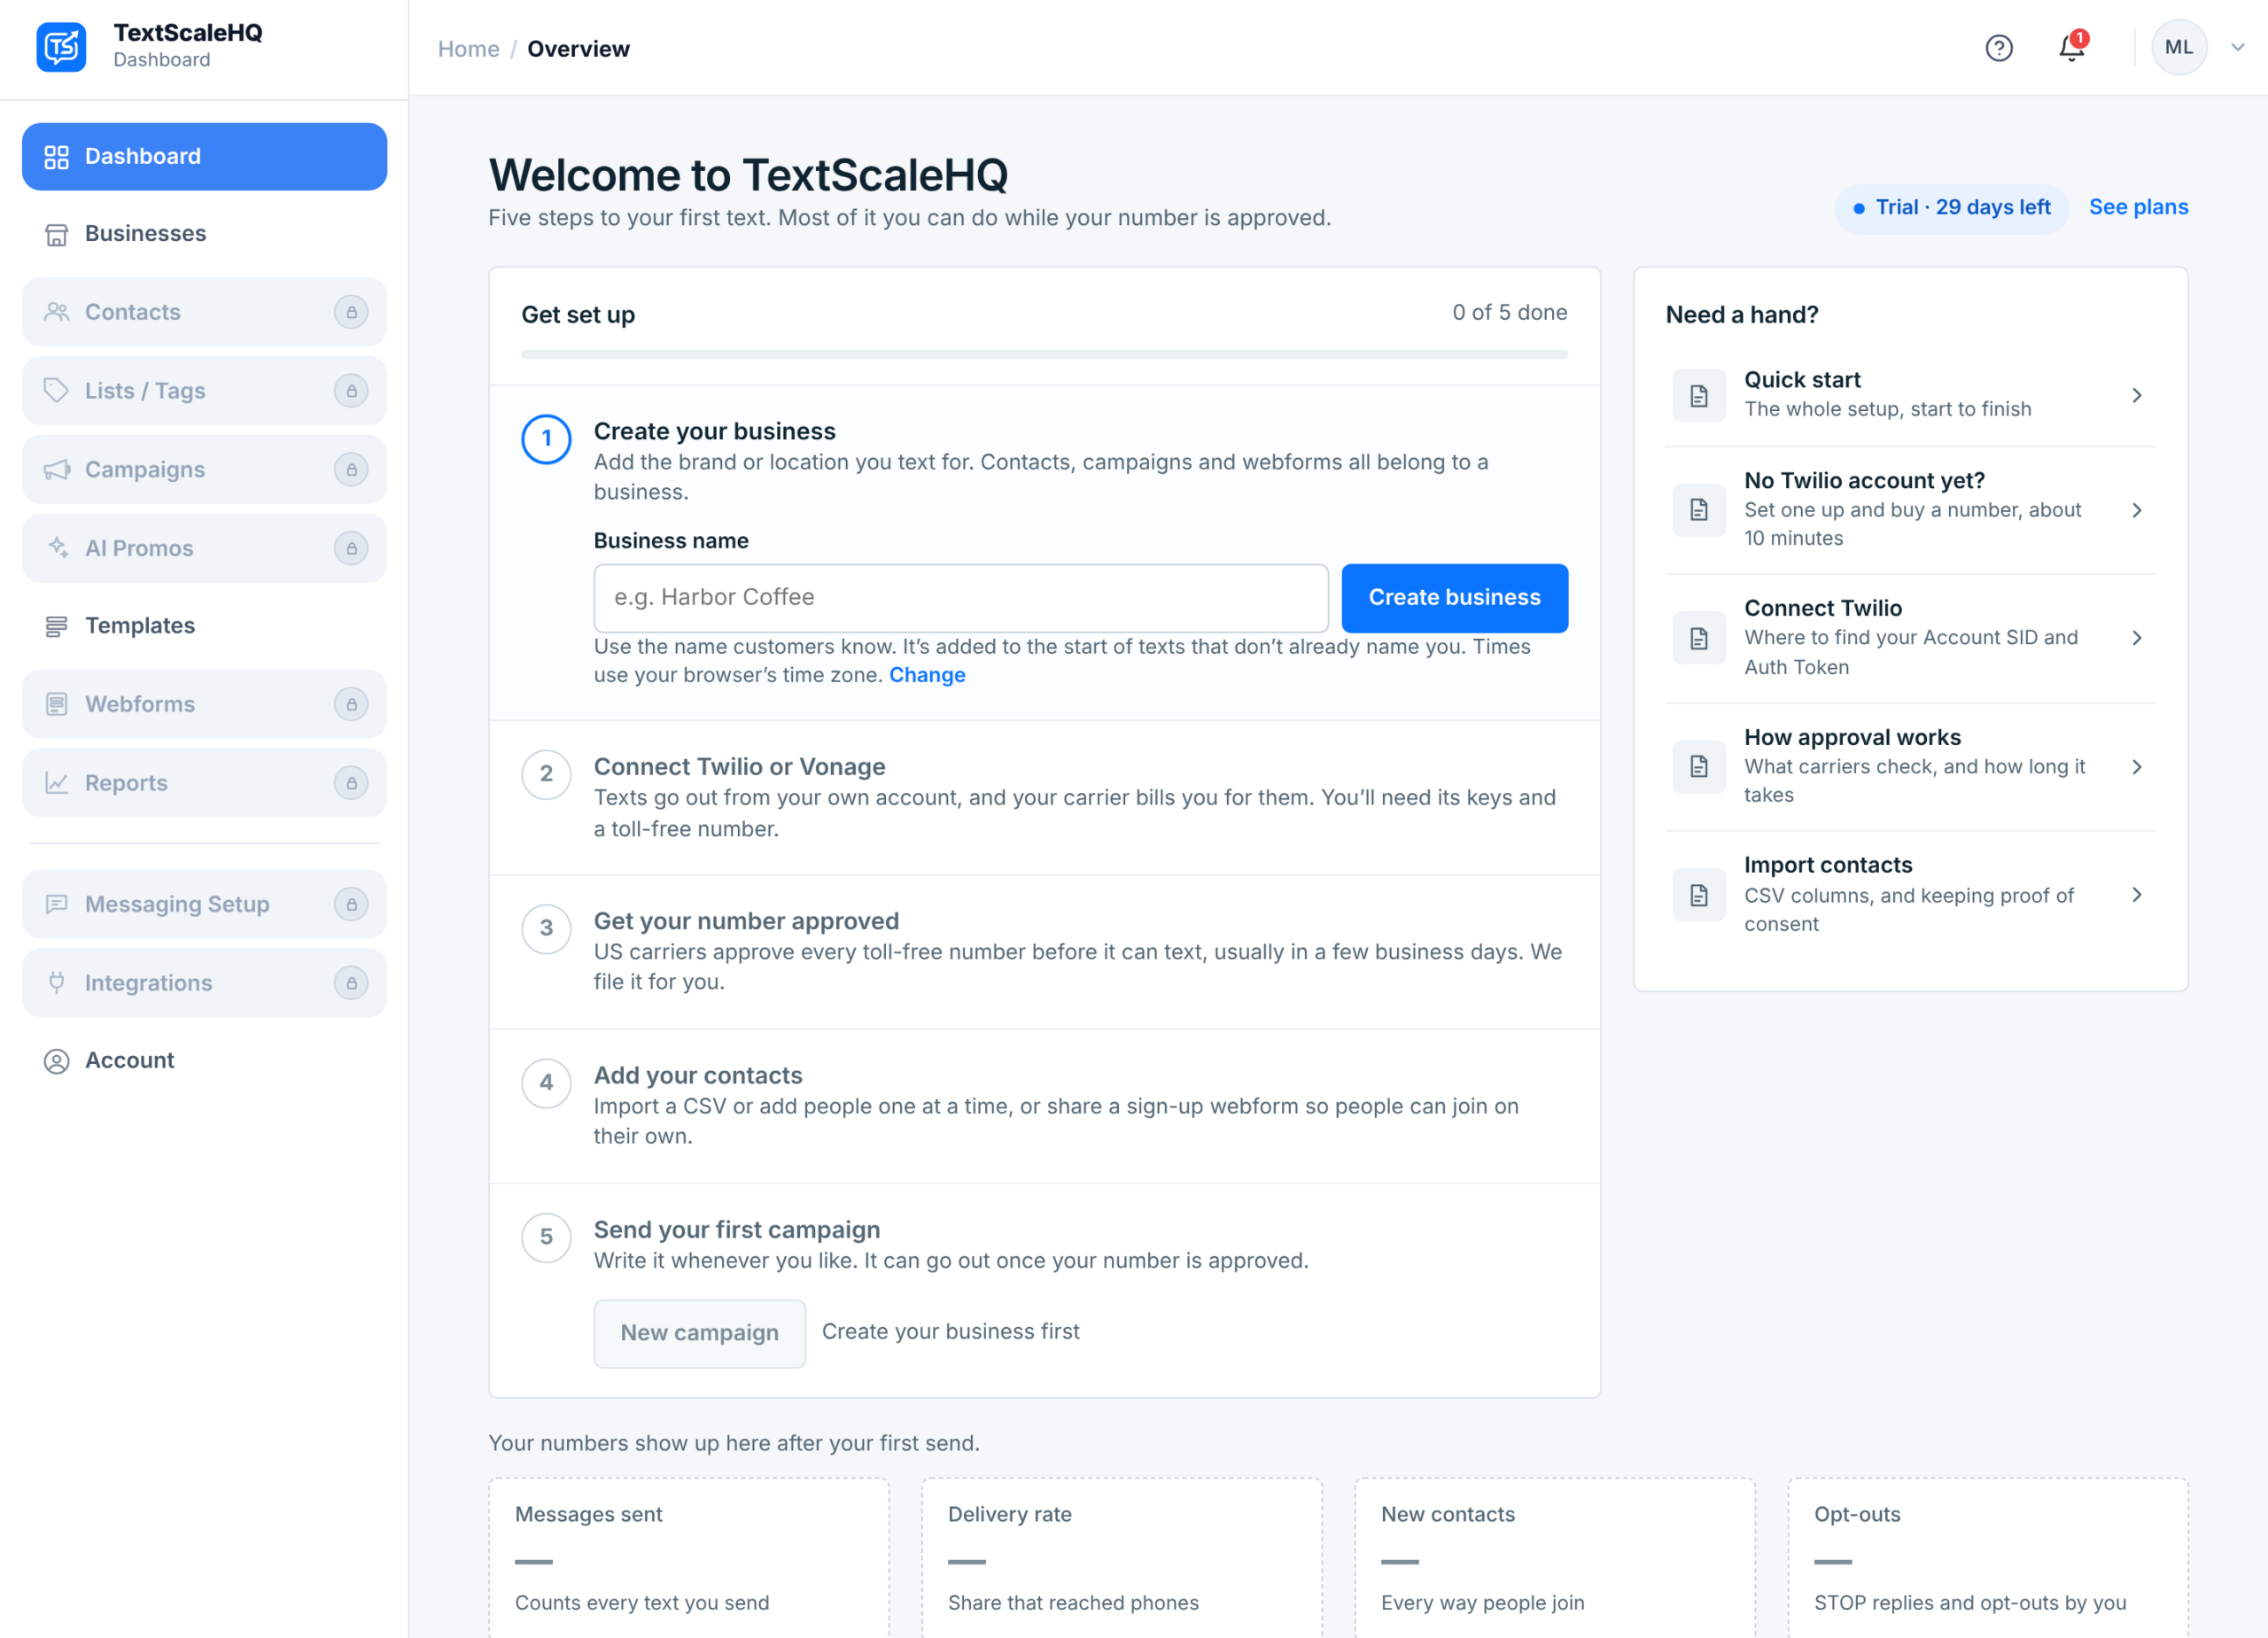
Two other things on this screen:
- Trial · 29 days left at the top right counts down your trial. See plans next to it opens your plan options in Account.
- Need a hand? on the right links to the guide for each step.
The row of empty tiles at the bottom fills in after your first send.
Contacts, Lists / Tags, Campaigns, AI Promos, Webforms, Reports, Messaging Setup and Integrations show a padlock until you have a business. They all belong to a business, so there is nothing to show before one exists. Dashboard, Businesses, Templates and Account are always open.
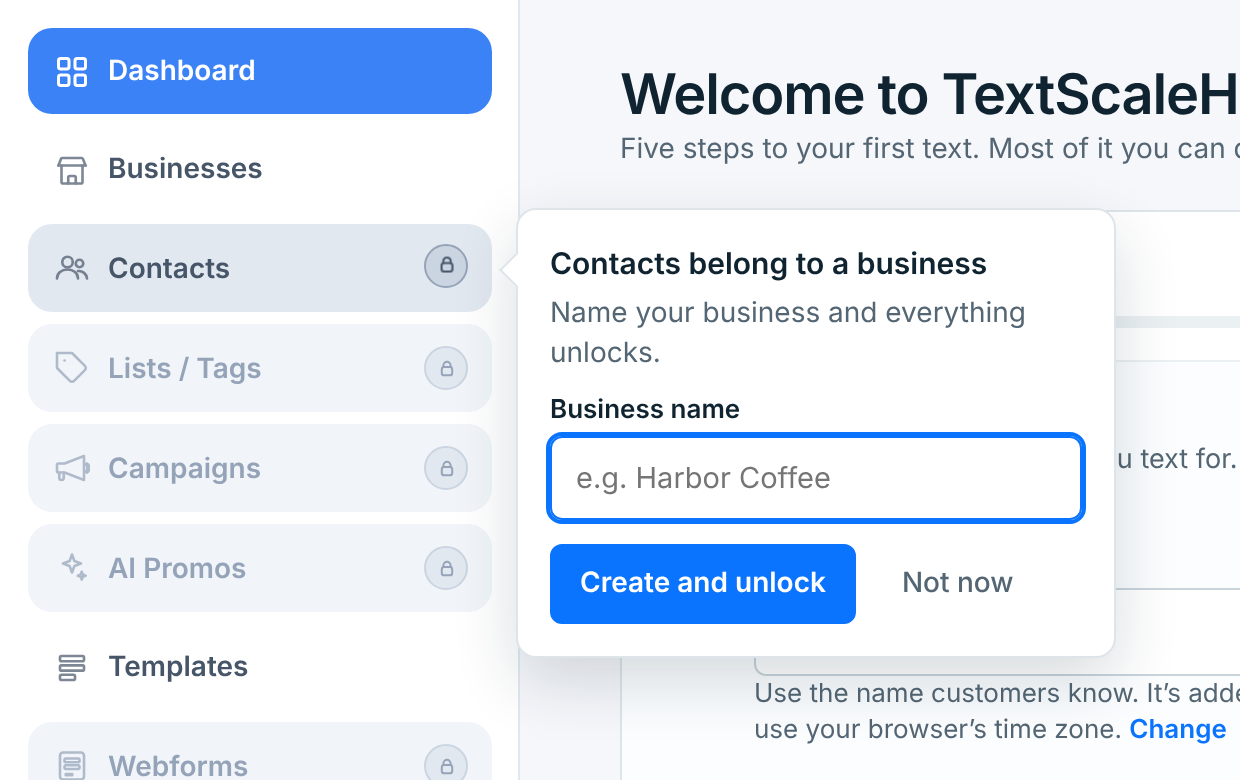
Click a locked item and a small box opens beside it. Type your business name, click Create and unlock, and the section you clicked opens with everything unlocked. It is the same as step 1, just from wherever you happen to be.
Step 1 — Create your business#
A business is the brand or location you text for. Your contacts, campaigns, webforms and carrier connection all belong to it. If you run one shop you need one business. An agency adds one for each client.
Type the name into Business name on step 1 and click Create business. Use the name your customers know: it goes at the start of every text that doesn’t already mention it, so people know who is texting.
| Field | Description |
|---|---|
Business nameRequired |
Up to 40 characters. You can rename it later in Businesses. |
Time zoneOptional |
Taken from your browser. Click Change under the field to pick another one. Campaign times are set in this time zone. |
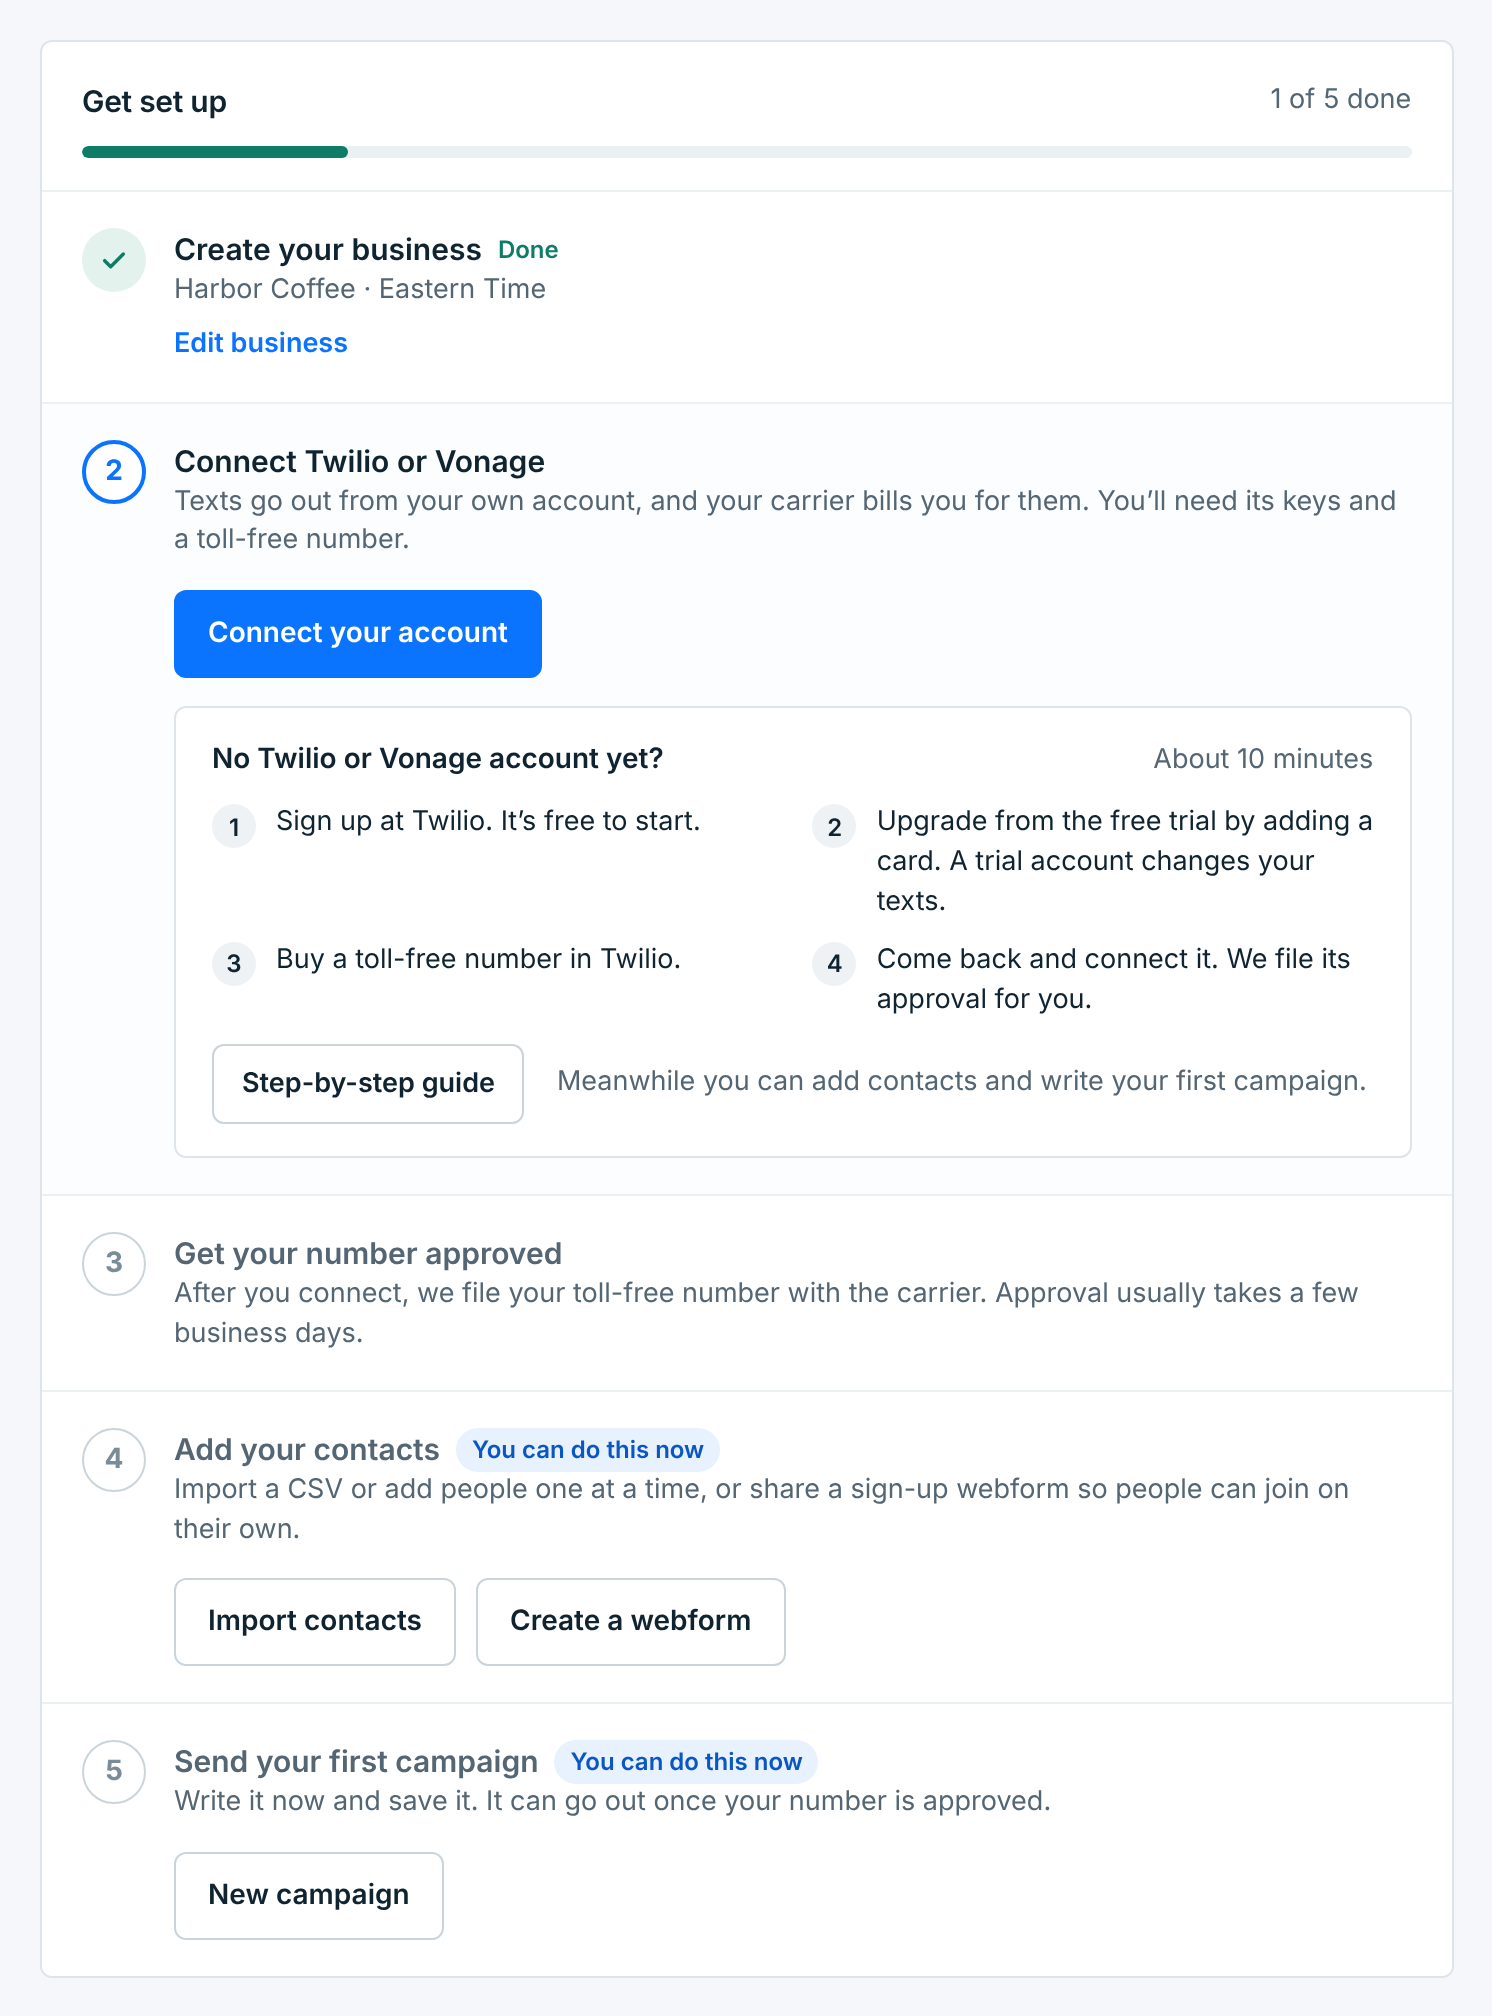
The sidebar unlocks straight away and the checklist moves on to step 2.
Every business after this one is added from Businesses → New business. What a business is covers the rest.
Step 2 — Connect Twilio or Vonage#
Texts go out from your own carrier account. To connect it you need the account’s keys and a toll-free number on it.
No account yet? Step 2 shows a short box, No Twilio or Vonage account yet?, with the four things to do first:
- Sign up at Twilio. It’s free to start.
- Upgrade from the free trial by adding a card.
- Buy a toll-free number in Twilio.
- Come back and connect it.
Vonage works the same way. Get a Twilio or Vonage account covers both, with what it costs.
Don’t skip the upgrade. A Twilio trial account only delivers to numbers you have verified by hand, and it adds its own words to every text. A campaign from a trial account looks sent while almost nobody gets it.
Click Connect your account. It opens Messaging Setup → Connection. Pick your carrier and paste the keys. For Twilio that is the Account SID and Auth Token, both on the first page of the Twilio Console after you sign in.
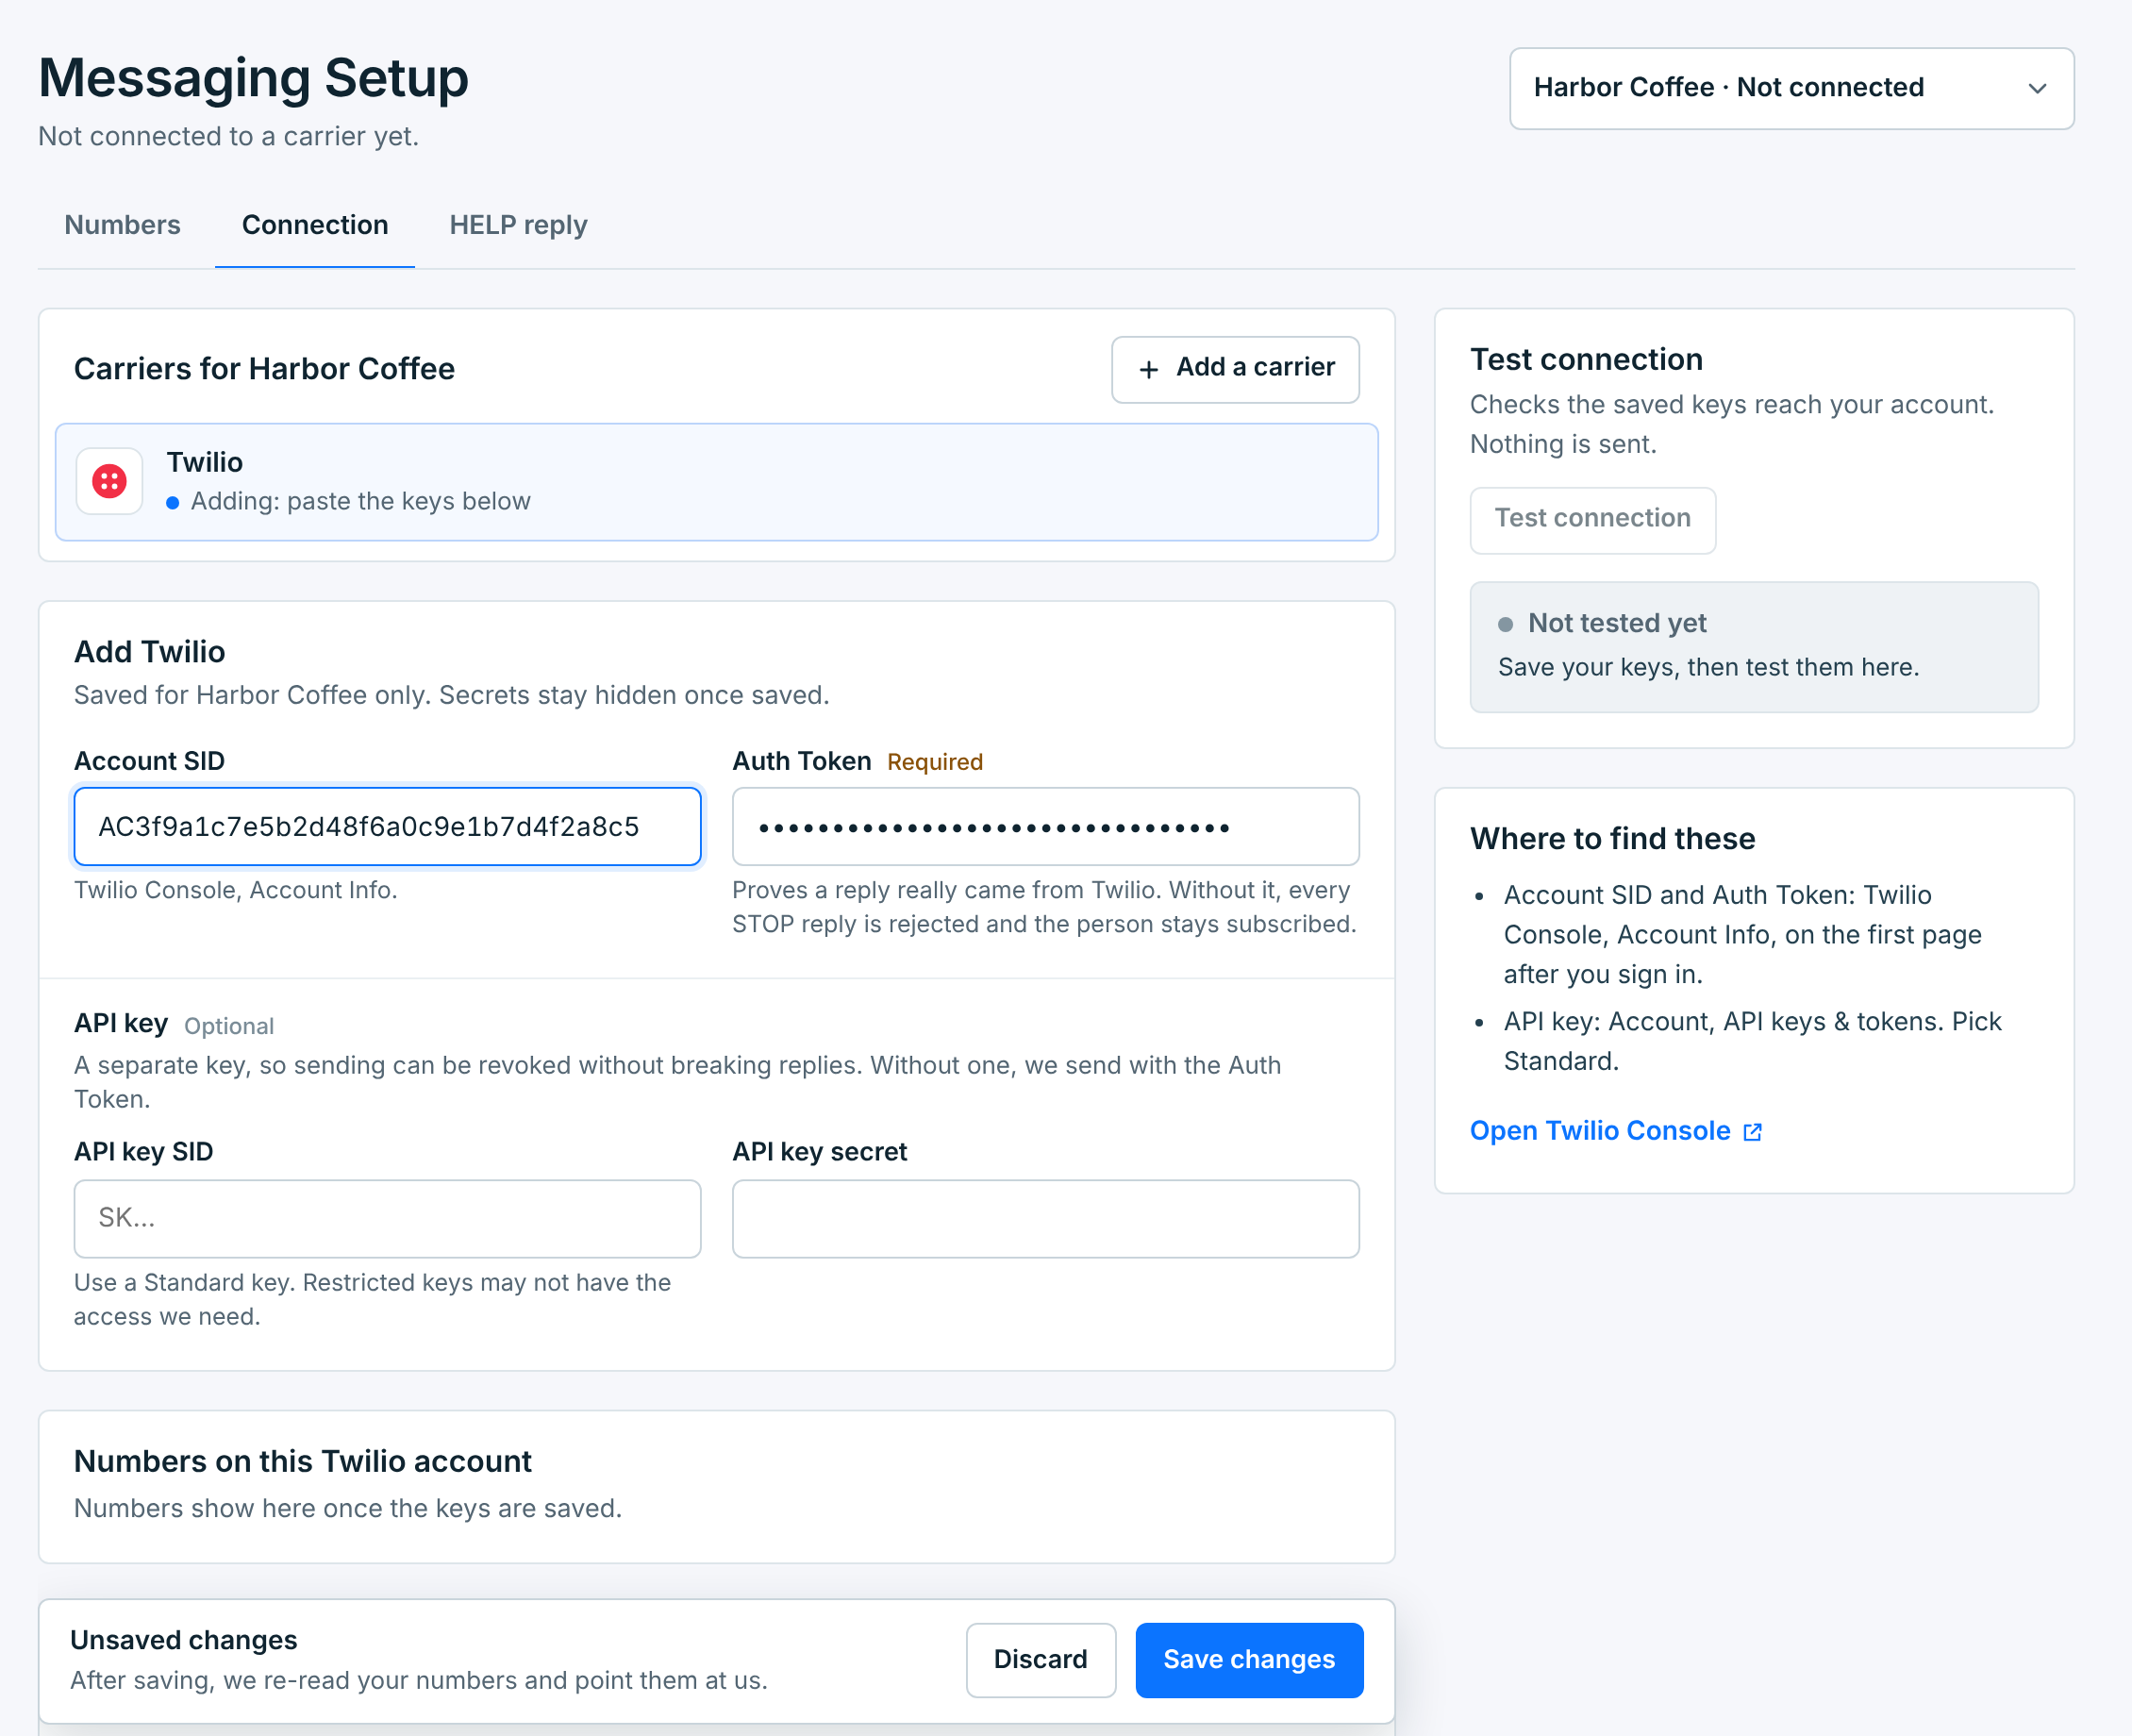
Click Save changes. We read the numbers on your account and point their replies at us, so STOP and HELP work without you touching the Twilio Console again.
Back on Numbers, Messaging Setup lists what the business still needs before it can send. Right after connecting, that is usually one thing: the registration.
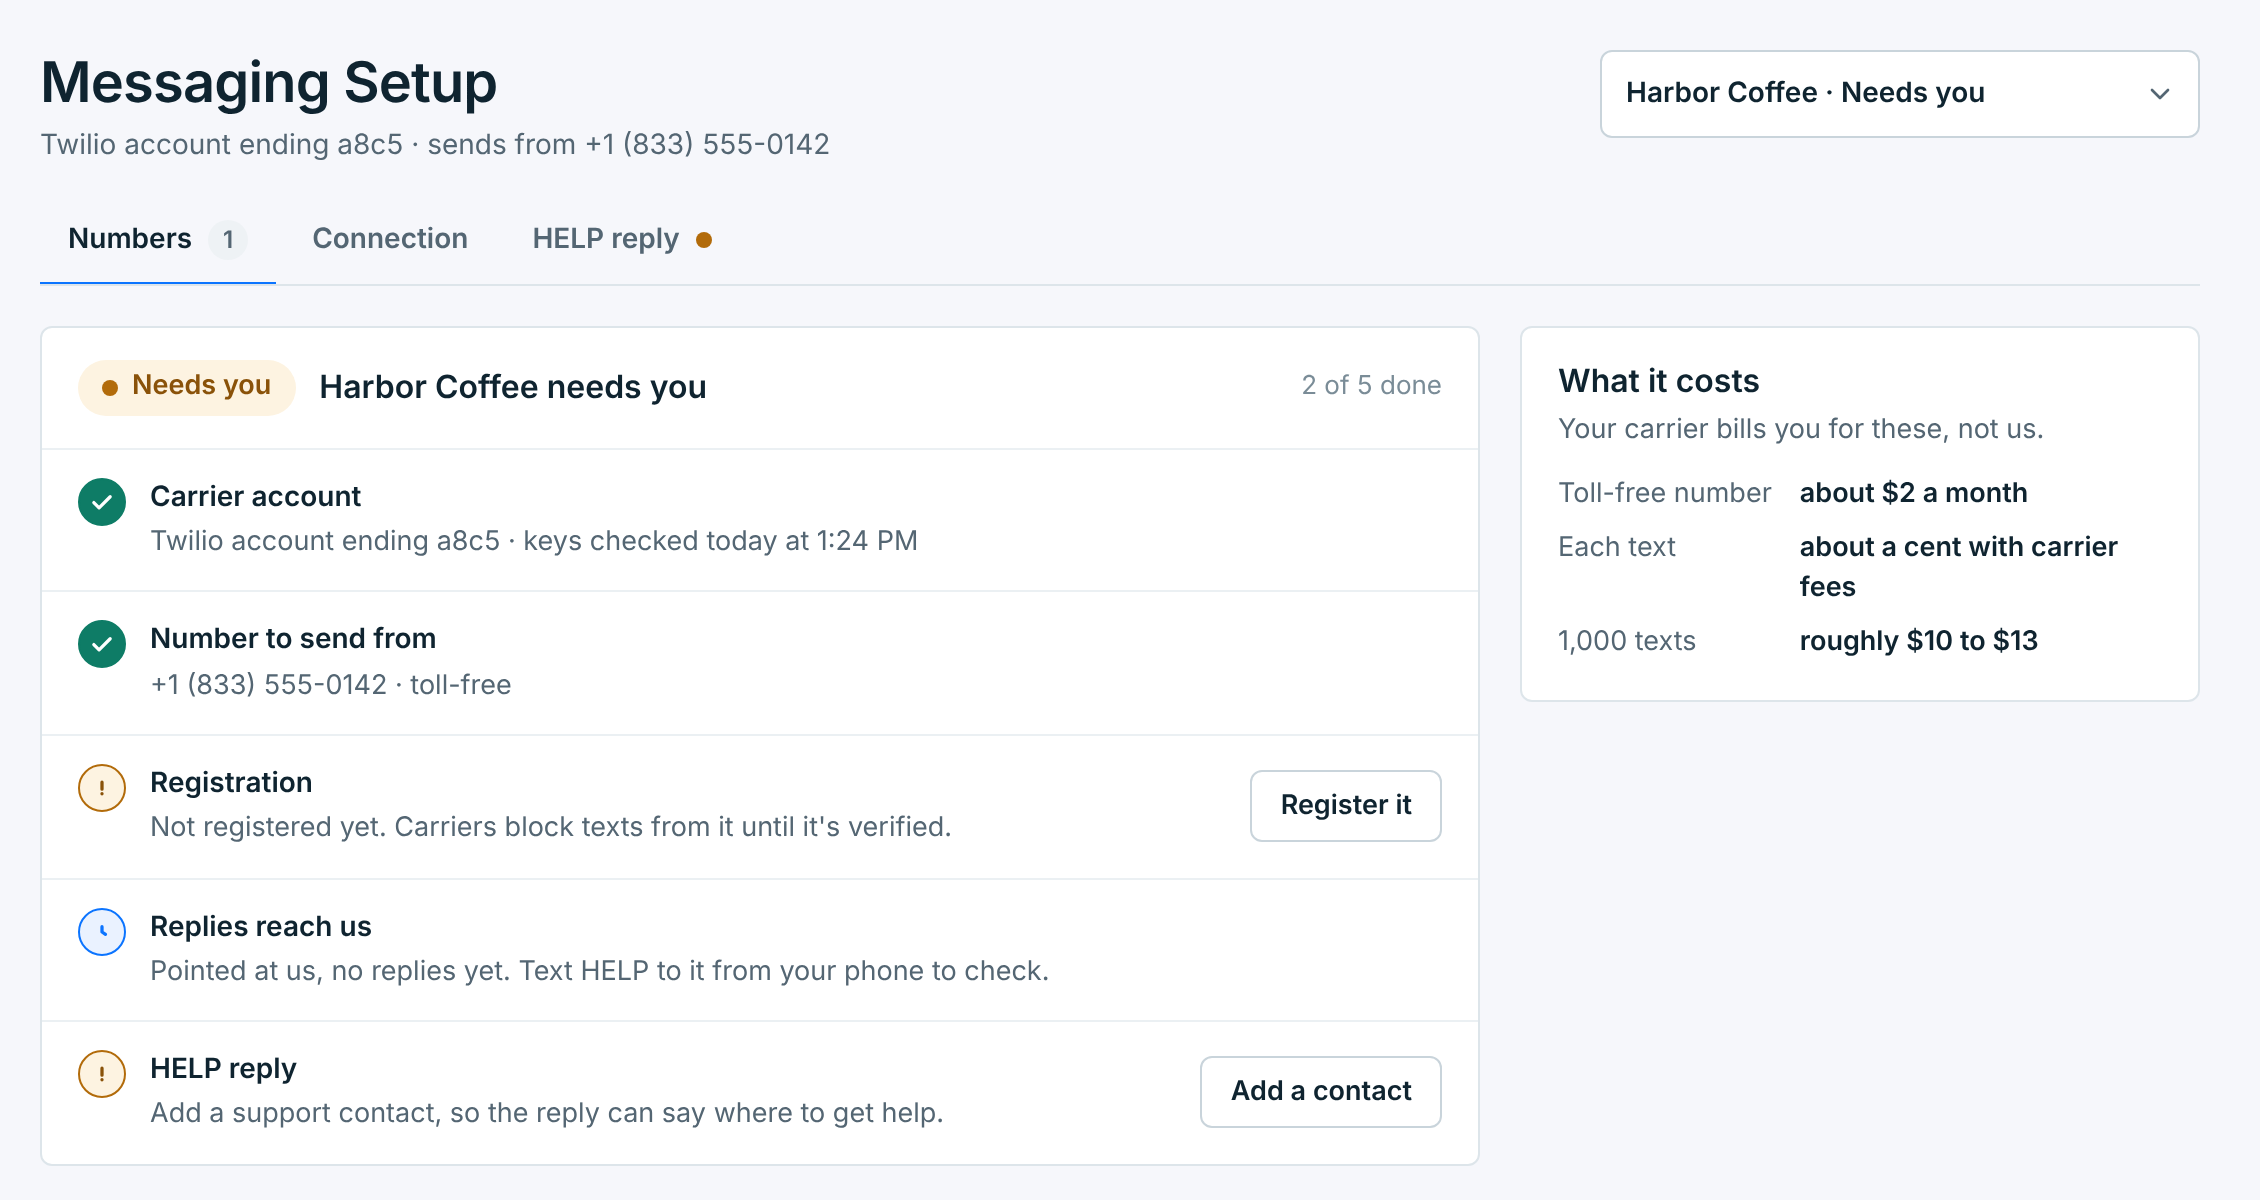
The full walkthroughs, with every field explained: Connect Twilio and Connect Vonage.
Step 3 — Get your number approved#
US carriers block texts from a toll-free number until it is verified. We file the verification for you, on your own carrier account, so it stays yours if you ever leave.
Click Register it (or Register this number on the dashboard). Most of the form is filled in from your business already. Answer the rest in six short sections and click Send for review. It takes about five minutes.
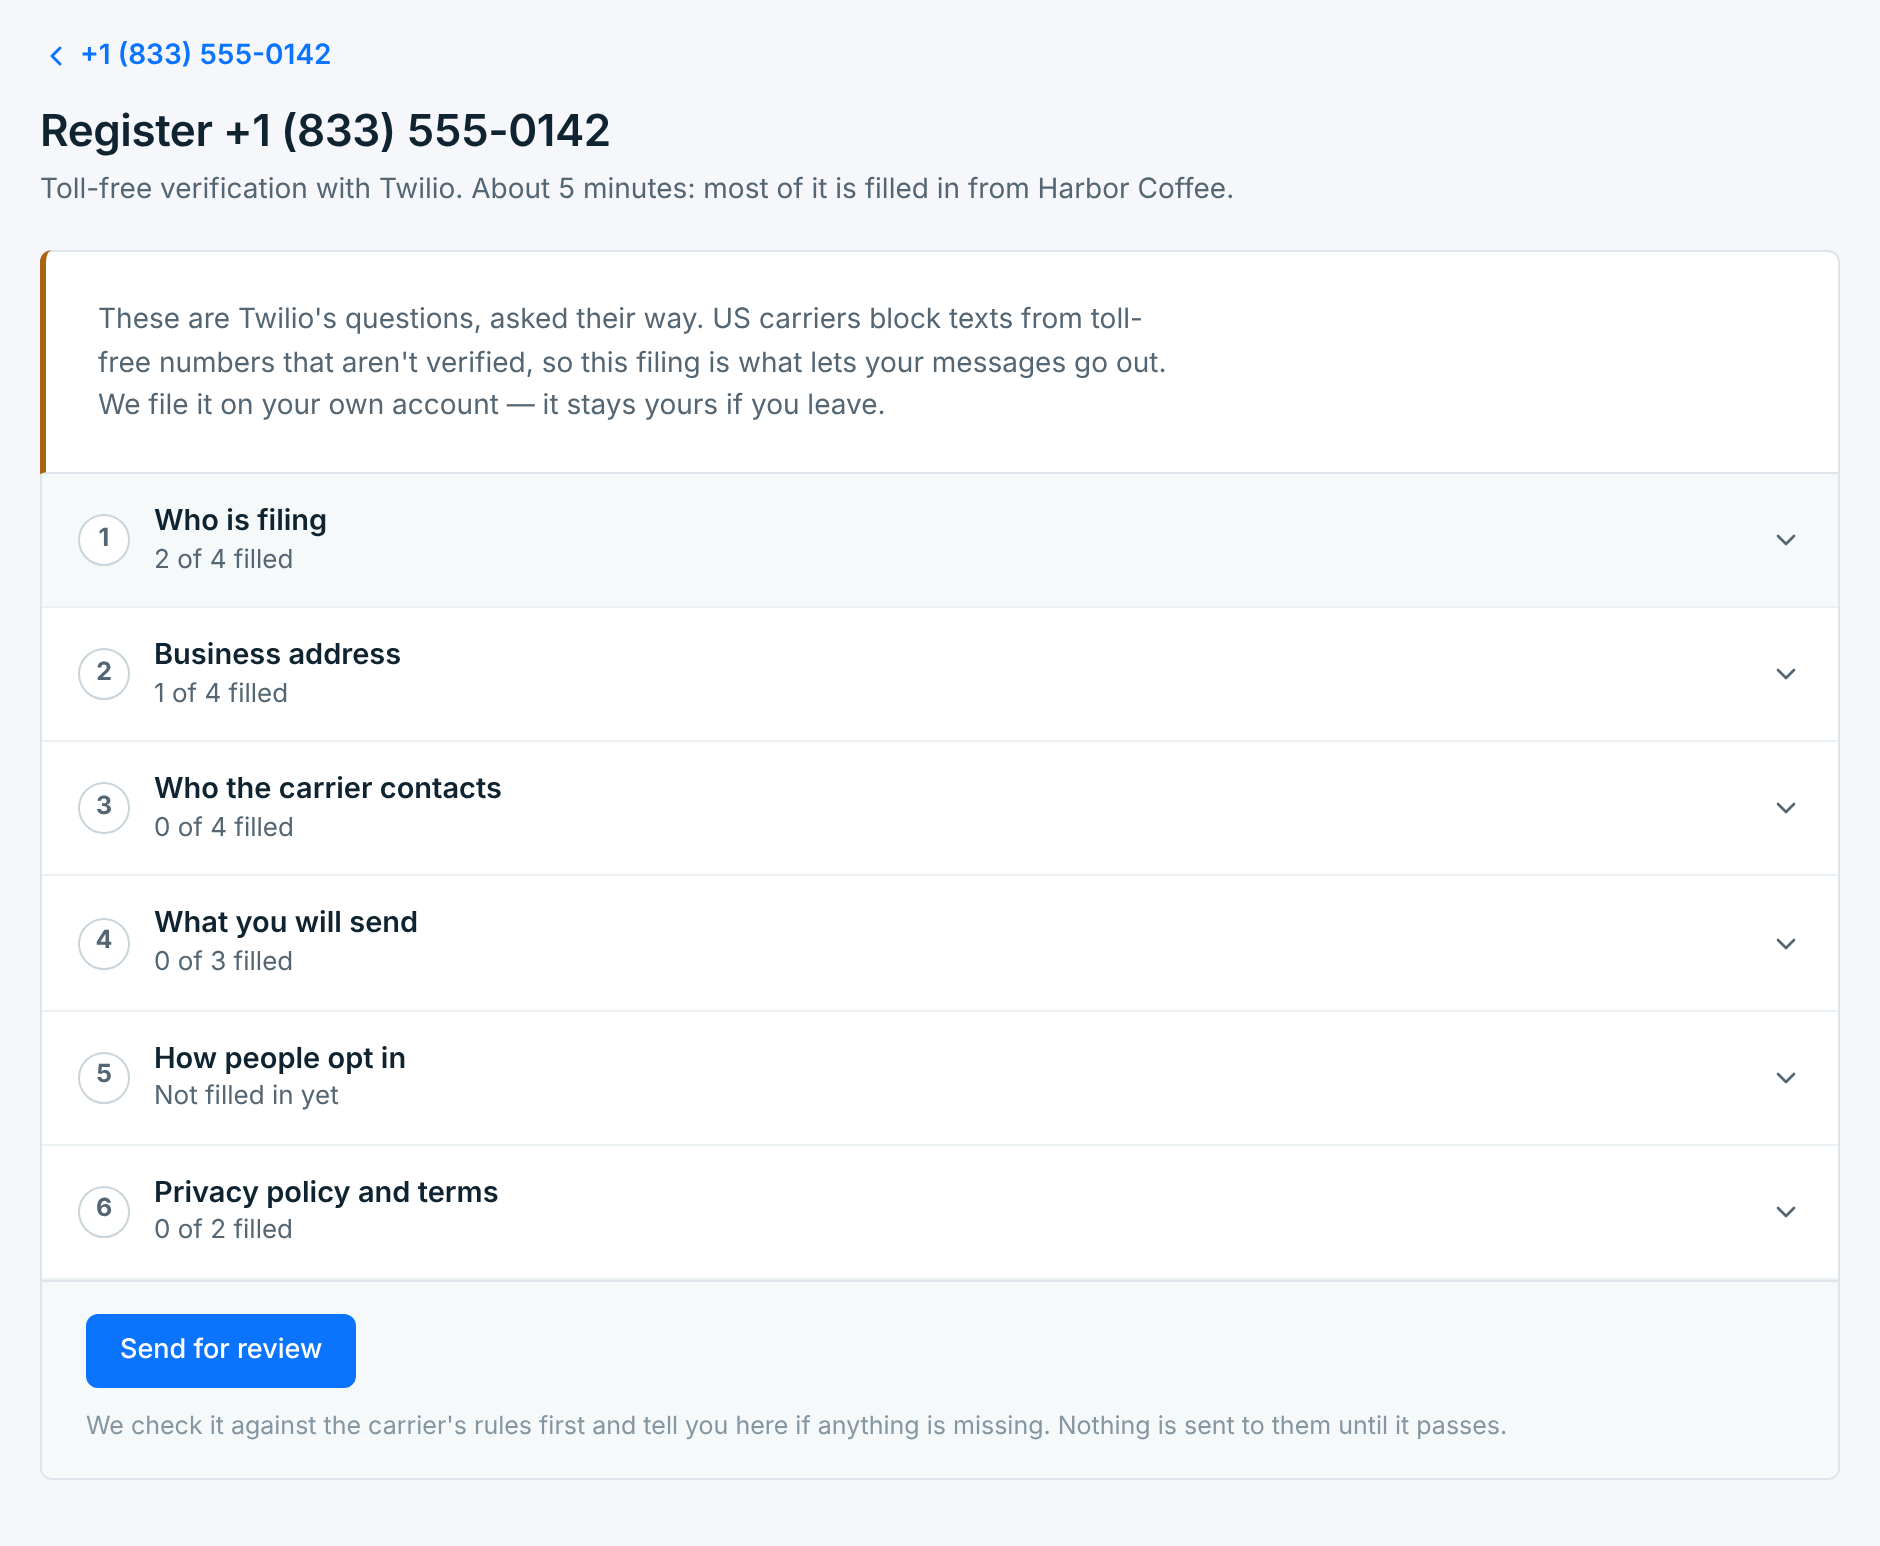
What happens next:
- We check it first. We read every filing before it goes to the carrier, so it isn’t turned down for something small. If something is missing, we tell you in Messaging Setup.
- The carrier reviews it. A person at the carrier checks your business and how people sign up. This usually takes a few business days.
- You hear when it’s decided. We email you and ring the bell at the top of your dashboard.
Every section of the form, and what to do if the carrier rejects it: How toll-free approval works.
Meanwhile the dashboard says Almost ready to text, and steps 4 and 5 are marked Do this while you wait.
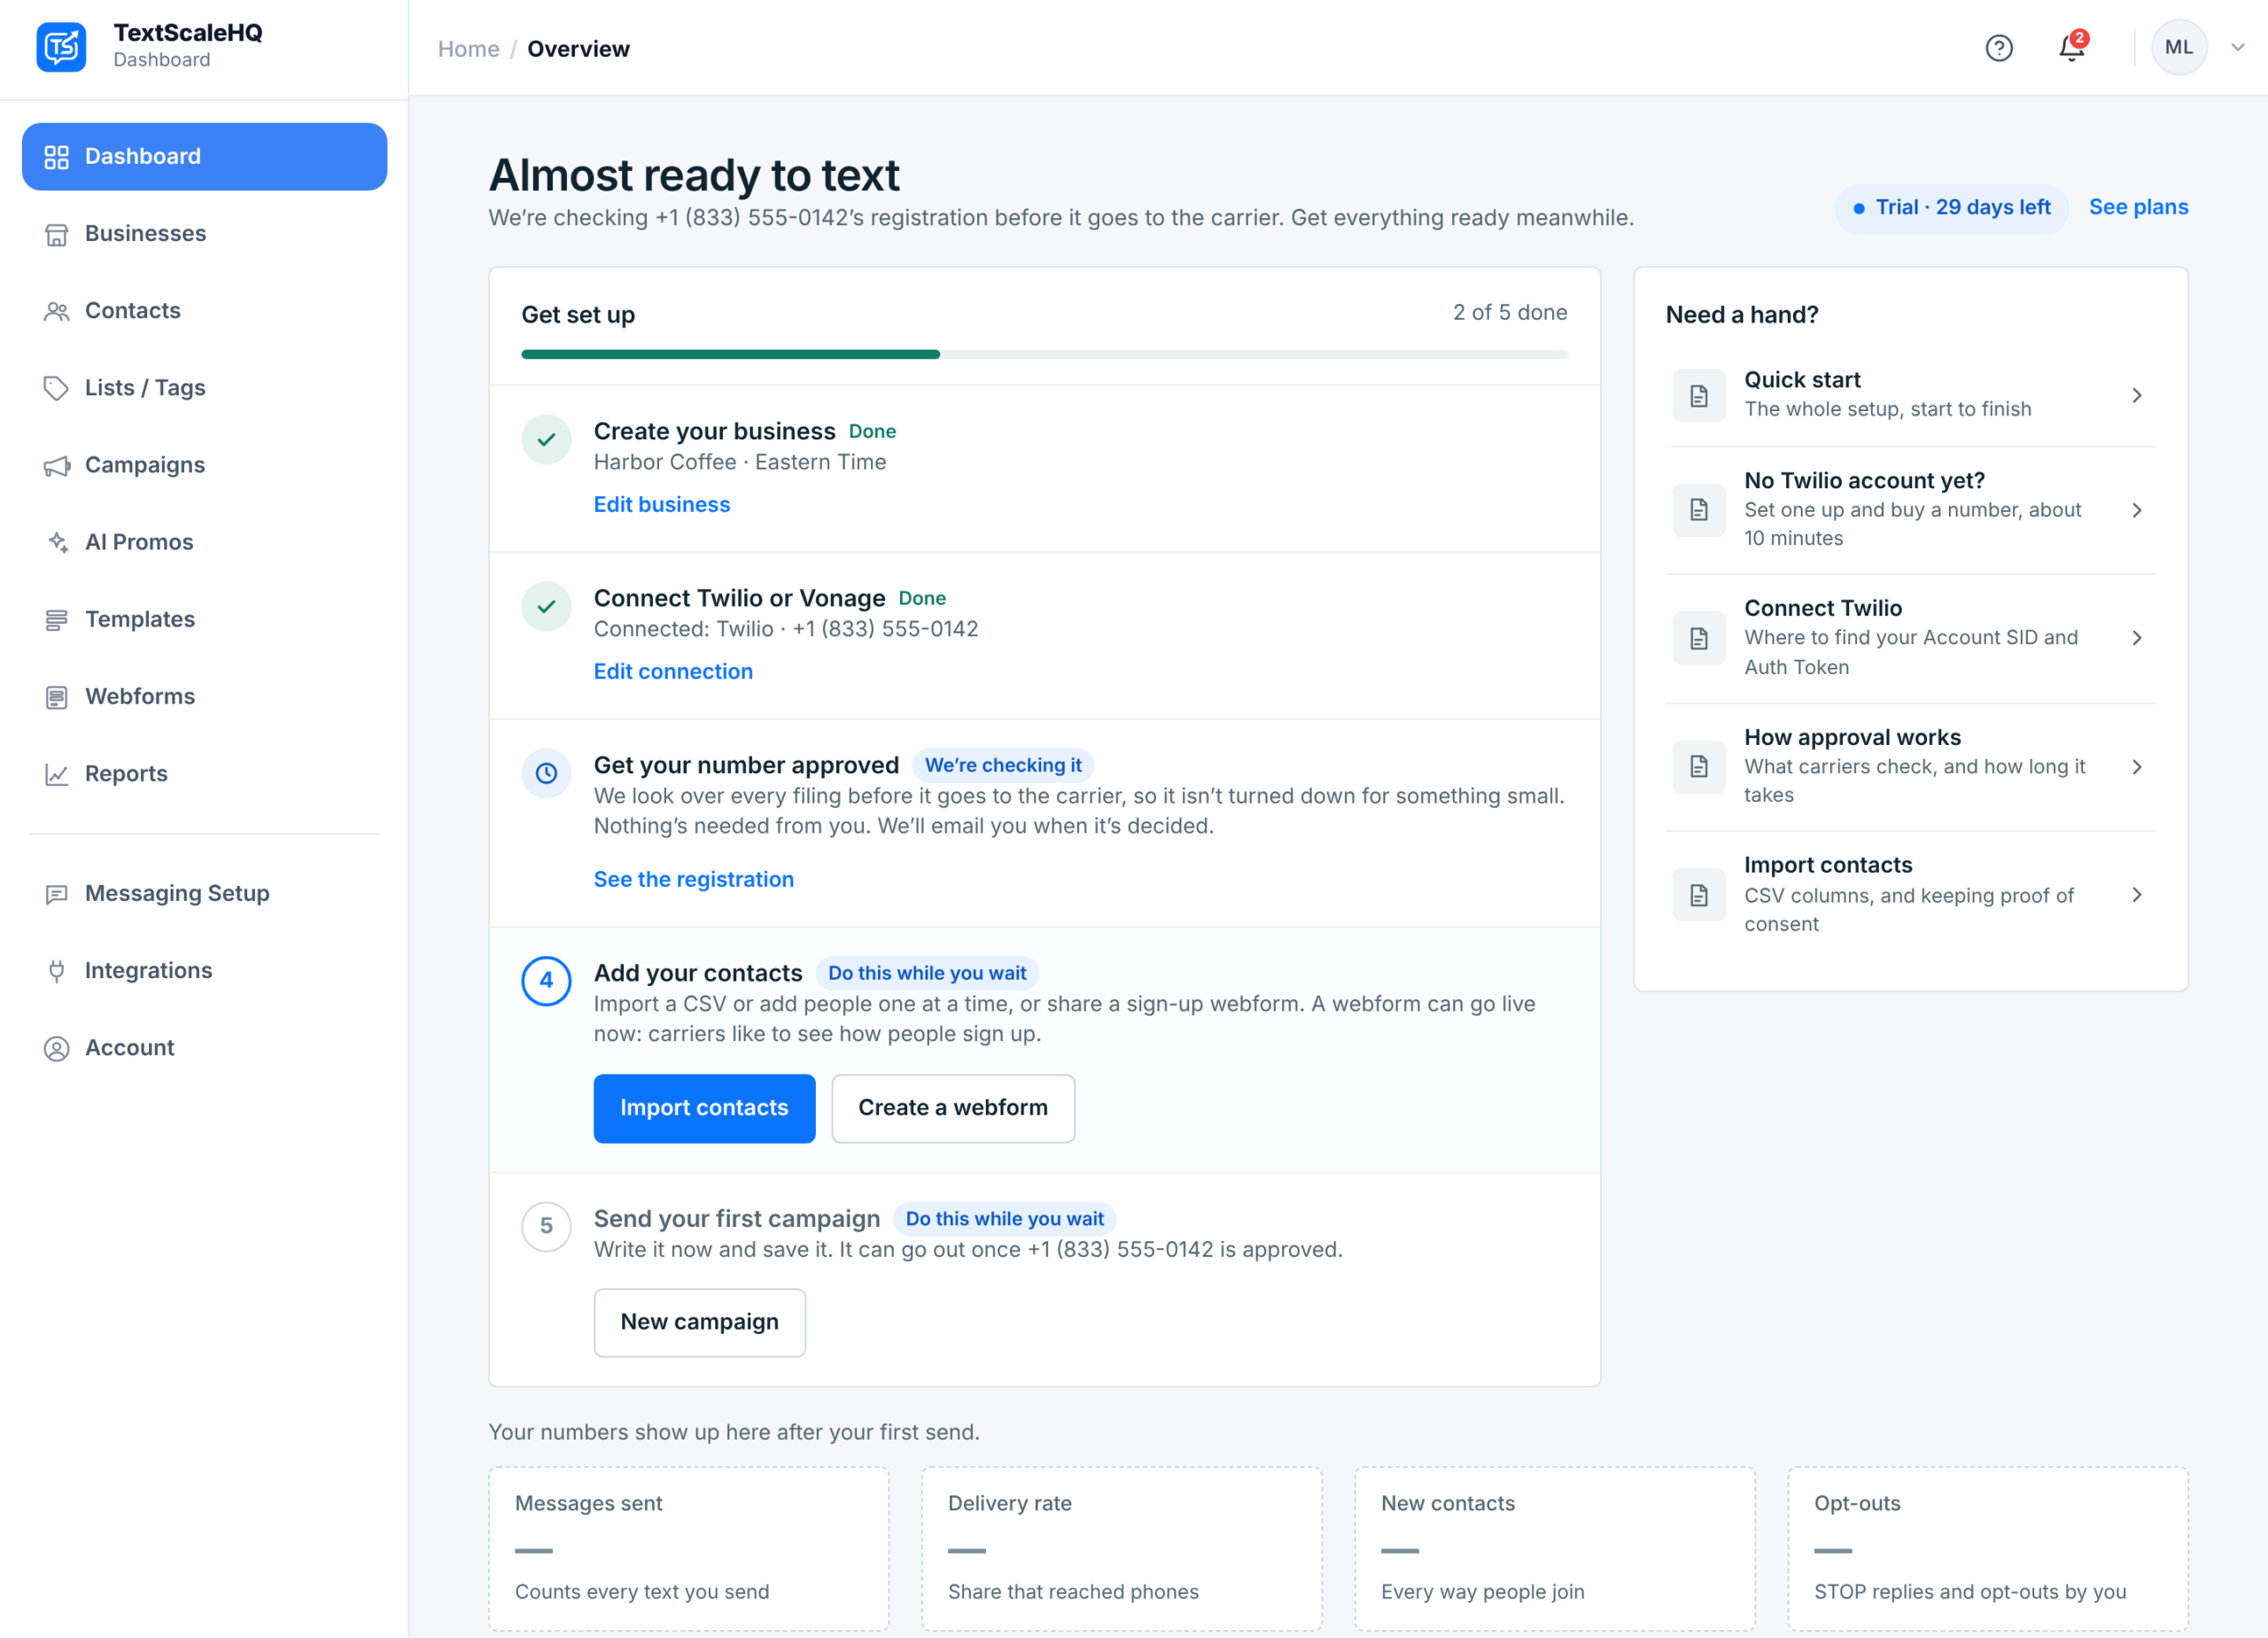
Already got your toll-free number verified before you joined? There is nothing to file. The step shows Already approved and you can send right away.
Local (10DLC) numbers work too, as long as their campaign is already approved in your Twilio or Vonage account. We only file toll-free numbers.
Step 4 — Add your contacts#
There are two ways to build your list, and you can use both:
- Import contacts. Upload a CSV, or add people one at a time. Only add people who agreed to get texts from this business. Consent doesn’t carry over from an email list or from another brand.
- Create a webform. A signup page with its own link and QR code. Everyone who joins through it is added with their consent recorded, including when they signed up. A webform can go live before your number is approved, and carriers like to see one when they review your filing.
How-tos: Add and import contacts and Create a webform.
Opt-outs are kept per business. Someone who texts STOP to one of your businesses is still subscribed to your others. For an agency that is what you want, and it means each business keeps its own consent records.
Step 5 — Send your first campaign#
Click New campaign any time. Before your number is approved you can write the campaign and save it. When the number is approved the dashboard changes to You’re ready to text, and step 5 is marked Ready to send.
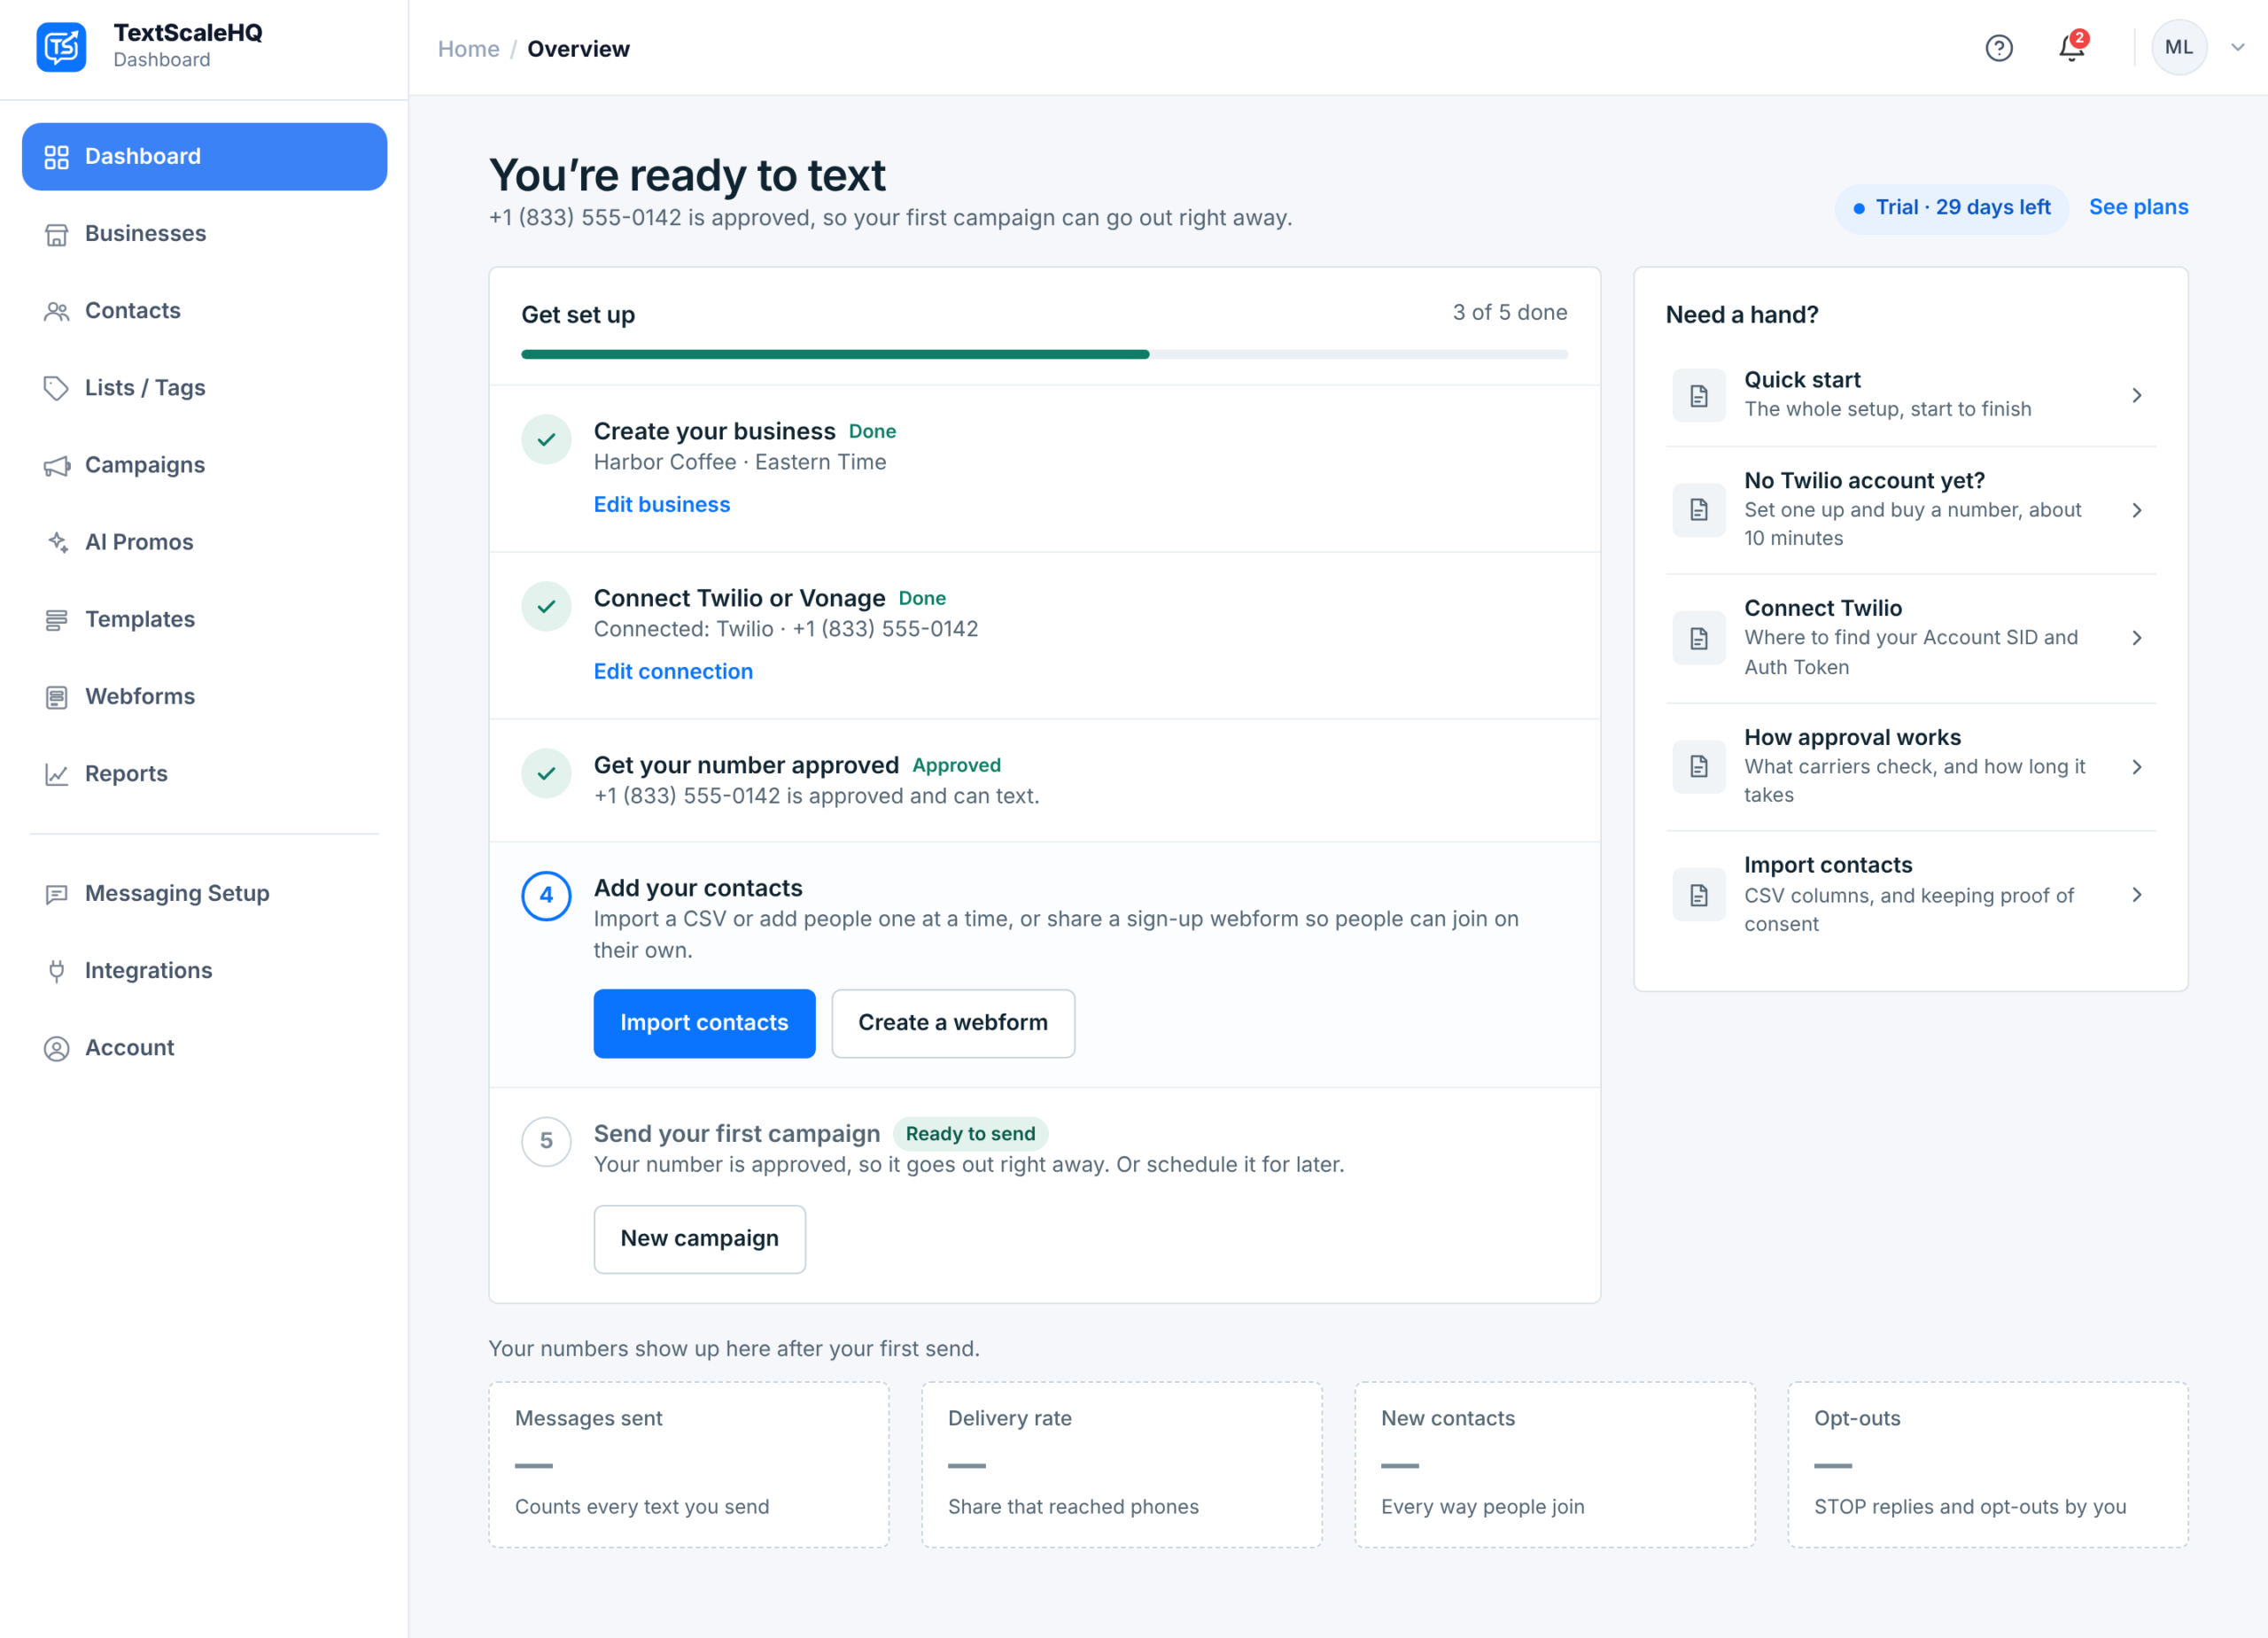
From there a campaign goes out right away, or at the time you schedule. Send a campaign walks through it.
What’s next#
- After your first send, the dashboard swaps the checklist for your numbers: messages sent, delivery rate, new contacts and opt-outs. Your dashboard walks through it.
- Add a support contact in Messaging Setup → HELP reply, so the automatic answer to HELP says where to reach you. On Twilio there is one more step in your Twilio Console; see Replies, STOP and HELP.
- The trial runs at Starter limits: 2 businesses and 500 contacts. Choose a plan in Account before it ends. If you pick one during the trial, you keep your free days and the card is first charged when the trial ends.